
Do you love fringe as much as I do?? I haven’t found a piece that doesn’t look amazing with fringe and when I designed the Riverwalk Poncho, I knew it had to have it! Learn how to add fringe to crochet below.
⇢Pin it here!
⇢Check out FREE Crystalized Designs patterns here!
How to Create Fringe
This technique is super easy and fun to do! I even have my two older boys help me separate the strands to make things go quicker. First though, determine the length you want the fringe. Err on the side of caution and go longer as you can always trim if needed. When you know the length you want the fringe, double it as you’ll be folding the strands, and add a bit of length for the knots. The amount of length used for each knot will vary depending on yarn weight and how many stands are in each group. It’s recommended to test out a length before cutting all the fringe needed in case you want to increase or decrease length. Now, let’s check out the process!
Once you have your length determined, cut a piece of cardboard to that length. I normally use one of my children’s cardboard books as I can slightly open the pages and cut between. If you’re using just cardboard, you’ll just cut along side the edge.

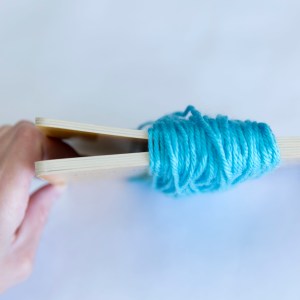
Wrap yarn continuously around cardboard/book. If using a book, slightly separate pages.


Cut along edge of cardboard/inner page of book. Once all are cut, keep ends even and fold desired number of strands in half. For my current project, I choose 3 strands per knot, 6 strands of fringe. This is where my children helped out. They made piles of 3 strands.
How to Add Fringe to Crochet


Insert hook from back side to front side. Hook strands in middle.


Pull middle of strands partly through stitch. Make loop with strands (on wrong side) keeping ends as even as possible.


Pull ends of strands through loop. Pull to secure.

More About Crystalized Designs
Making one, or many ? I’d certainly love to see! Post any pictures to the Crystalized Designs Facebook Page or join the Crystalized Designs Facebook Group and post on the wall! Posting pictures may win you free patterns. Enjoyed this tutorial on how to add fringe to crochet? Leave a comment below!
Above all, thank you for visiting. I hope you enjoyed the pattern! Leave a comment below and again, I would love to see any pictures! Also, you can find me on Facebook, in my Facebook Group, or Instagram! I’d love for you to share on Pinterest! I’d be happy to follow you back on any social media, just leave a link below! However, if you want to see something from Crystalized Designs, I’m interested to hear! Feel free to email me with any suggestions. Therefore, you can email me at [email protected] or use the contact form.
Posts may contain affiliate links. At no additional cost to you, I may earn a small commission if you click and purchase items through these links. This enables Crystalized Design to bring you even more free patterns!


Hi Crystal! This article is just in time. I’m wanting to add fringe to a comfort shawl I’m almost finished with. Here are my questions:
1. When adding the fringe is there a guide for how many fringe sets to add? Every so many inches or what ever looks good?
2. Is fringe added before or after washing and shaping the crocheted item?
Thank you for sharing this tutorial and your craft with everyone!
Hello! I normally include the length to cut and amount of fringe to add to each section, as well as where exactly I put mine in my patterns. Though some don’t do that or a piece may be made without a pattern, it’s more of a personal preference. I find I like less stands when working with thicker yarns, and more for thinner.
Fringe can easily be removed if you find it too cluttered but I normally space mine or every other row/round, then see how it looks. If it doesn’t feel like enough, I add another set in-between. I also cut my stands longer because it’s easier to trim than to take them all off and add longer ones.
I normally block prior to putting fringe on a piece but if the yarn is crimped, getting out wet may help straighten it out.
Hope this helps! If you have any more questions, don’t hesitate to ask!
Crystal