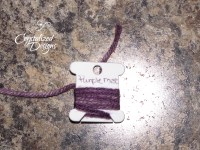
Ever dig through your stash looking for colors for a specific project only to make a mess? Looking to share color choices at a craft fair? Then this Yarn Color Swatches Tutorial is perfect for you!
Pin this tutorial for later!
I use these swatches when searching for colors to coordinate, the few times when I’m a vendor in a craft fair I bring them to show color choices and brands, and any time I think I may receive a custom order. Several times, when people order items, they tend to be very vague on the colors. “I would like a blue and grey hat and cowl set for my daughter to match her jacket.” Riiiiiight! Like there’s only one shade of a color… and even if I did guess, I’m about 99.9% sure I’m not matching anything without seeing it. Am I the only one it happens to? Whether it’s family, friends, or a paid customer you’ve never met, it’s best to have the customer decide exactly what colors he or she would like.
Easy Yarn Color Swatches

Materials:
- Hot Glue Gun
and Glue
- Plastic or cardboard bobbins (I used plastic as they’re more durable)
- Permanent Marker
- Yarn
- Tapestry Needle
- Scissors
- Split Keychain Ring
- Chocolate ~ as long as your not working with white yarn! Hehe… in my case, yarn and chocolate always seem to go together!
Step 1)
Preheat your glue gun.
Step 2)
Write the name of the color/brand of yarn on your bobbin. This can be done after but is easier to do before wrapping your yarn.

Step 3)
Taking a small amount of yarn, loop it around one slit at the bottom of the bobbin. Wrap it 5-7 times. (More times for thinner yarn, less for thicker.) From the back of the bobbin, loop the other end around the opposite slit.
Step 4)
Using your yarn needle, weave the yarn ends behind the wrapped yarn just as in picture shown to the left.

Step 5)
With the glue gun ready, place a small amount between and around the ends as shown in picture to the right. This will secure it.

Step 6)
Let the glue dry.
Step 7)
Snip the ends to give more of a neat appearance.

Step 8)

And there you have it! Just don’t forget to eat your chocolate 🙂
Have a different way to make yarn color swatches? Feel free to post a link in the comments below! I’d love to see the way you do it!
More About Crystalized Designs
Making one, or many ? I’d certainly love to see! Post any pictures to the Crystalized Designs Facebook Page or join the Crystalized Designs Facebook Group and post on the wall! Posting pictures may win you free patterns. Enjoyed this Yarn Color Swatches Tutorial? Leave a comment below!
Above all, thank you for visiting. I hope you enjoyed the pattern! Leave a comment below and again, I would love to see any pictures! Also, you can find me on Facebook, in my Facebook Group, or Instagram! I’d love for you to share on Pinterest! I’d be happy to follow you back on any social media, just leave a link below! However, if you want to see something from Crystalized Designs, I’m interested to hear! Feel free to email me with any suggestions. Therefore, you can email me at [email protected] or use the contact form.
Posts may contain affiliate links. At no additional cost to you, I may earn a small commission if you click and purchase items through these links. This enables Crystalized Design to bring you even more free patterns!

